
Susquehanna Flats, Image ID 03-122
|
ALMOST every step in making a night picture, from the choice of viewpoint to the
development and printing, presents a different and interesting problem. Unlike
daytime photography, where you may have a meter to guide your steps, night photography
is done on the guess system and your judgment will be called upon often.
About viewpoints, it pays to be choosy because a few feet one way or another may
make a great deal of difference in the effectiveness of your print. Bright lights
which may not be desired in the picture, may be screened from the lens by shifting
the camera position until they are hidden behind a tree or other object.
Even the type of night has a decided influence on the creation of an interesting print.
It cannot be too strongly emphasized that the most successful pictures are the result
of choosing a wet or misty night when the reflections from streets and objects in the
scene will add life and sparkle. Do not attempt pictures on bright moonlight nights as the
results will probably prove disappointing.
Like a wet night, a snowy night is also productive of good shots. If you do not like
the idea of venturing out while it is raining or snowing, plan to get going as soon
as the bad weather stops but while the streets are still wet or the snow is still fresh.
When making pictures in bad weather, be sure to protect the camera and lens by setting the
camera up in a doorway, or other protected spot, or shielding it with an umbrella or a focusing cloth.
Another advantage to making night pictures during inclement spells is the fact that at that time the clouds
hang low and reflect a great amount of light back upon the earth. This is especially true over cities,
where most of the night pictures will be made. A bright moon and a hazy sky will almost completely
destroy the nighttime effect.
Any type of camera may be used but my preference is for a camera having a ground glass focusing screen,
a rising and falling front and a swing back. As many of the night pictures are architectural in
character, these adjustments are very helpful. The faster the film, the better, for not only are
the fast films softer in gradation but their use requires shorter exposures and reduces the
probabilities of motion spoiling the picture. The motion may be either in the subject itself
or camera shake induced by vibration of vehicles.

Naval Academy, Image ID 08-098
This picture, made at a military academy dance,
shows the usefulness of multiple flash in making
outdoor shots at night.
|
If you have a camera with a ground glass, you will have little difficulty focusing on a subject
such as a street scene. However, when working on a smaller subject, such as the picture of the
cadet and his date on this page, there is usually not enough light to enable you to see well.
In cases like this, have one of the models, or an assistant, hold a lighted match or a flashlight
and focus upon that. By moving the small light from one side to the other you can see the limits
of your picture area, even though the subject itself may be but faintly visible on your ground glass.
A rangefinder may also be used and the best type of sight for cameras lacking the ground glass is
the wire frame viewer. Exposures should be calculated upon the shadows and intense highlights
left to take of themselves if the method of development given in this article is used.
The point is, do not be afraid to give a good, full exposure, even as much as five times
normal will do no harm. When no lights are visible in the scene, your exposure will be longer
than when lights are included. As there is no need for a short exposure, the lens should be
well stopped down to attain maximum depth of field.
In making pictures of office buildings in which lighted windows are desired, get out with your
camera in the fall, winter or early spring when darkness comes before the offices close.
Summertime is a bad time for such pictures. The best time to make these shots is shortly
after dusk, when it is not dark, but practically so. Enough light is then present to give
detail in the buildings themselves, as may be seen in this illustration.

Cathedral and Skyline, Image ID 27-063
The best time for city skyline pictures is that short period between dusk and darkness.
The evening light provides some detail in the buildings, which otherwise might be lost
if a later time were selected. Late fall, winter and early spring are the best times,
for then the offices are not dark before dusk.
|
There is another type of night picture which must be made in the daytime. at sunset or dawn,
and that is the imitation moonlight shot. The harbor picture below is an example of this
type of picture. In making the exposures, keep them very short and when printing the picture,
print it very dark so that the sun appears like the moon. Some of these pictures are very
effective and often the result is more realistic than an actual moonlight. The picture was
taken at sunrise in a slight mist and, as it was taken from a moving boat, an instantaneous
exposure with the lens wide open at f4.5 was used. This is one type of picture which can be
made with even the simplest camera.

Baltimore Habor Ships at Sunrise, Image ID 51-027
Apparently this is a harbor in the moonlight but actually the picture was made at dawn. A
considerable under-exposure was given and the print from the negative was over-printed to
give it a dark appearance.
|
The illustration at the head of this article was made in the early morning before the sun had
risen very far above the horizon. In this shot, ice instead of water forms the reflecting element
for the sun's rays. The exposure was kept on the short side (again the principle of exposing for
the lights and letting the shadows take care of themselves). The print was "printed down" to
give the appearance of a moonlight picture.

Camerette cover picture
Rain Park Avenue, Image ID 26-215
|
The Camerette cover picture was made on a rainy night because of the reflective powers of the
clouds, aiding in the illumination of the shadow areas and because of the highlights which
are apparent in the street and on almost every projecting object in the scene. Because of the
great height of the steeple, it was necessary to mount the lens at the top of the lensboard and
then use the full rise of the rising and falling front. This is only possible with a lens that
well covers more than the film size. It was made in a 5 x 7 view camera using a Goerz Dagor
lens stopped down to f22.
The exposure took over a half hour because of the traffic on the street. In order to avoid
white streaks in the picture, which would be formed by the passing headlights of the automobiles,
the lens was covered with the filmholder slide each time a car approached or crossed the
intersection visible in the picture. While, as mentioned above, the total elapsed time in
making the exposure was a half hour, the film actually was uncovered only about six or seven
minutes, the rest of the time being taken by waits for traffic to pass.

Night in the Park, Image ID 02-066
Fog or mist provides interesting pictures. Here the lights hidden from the camera
produced a luminosity in the mist which made the silhouettes possible.
|
A fog or mist at night opens another road to different night pictures. The picture above (not in archive)
was made on a misty night. Several viewpoints were explored until one was found which hid
the lights from the camera, leaving only the luminous fog to record on the film.
The umbrella was used as a prop to steady the figure and, of course, the addition of this
bit of human interest adds to the effectiveness. The exposure was 30 seconds at f6.3.
The fog, spreading the light from the lamps, formed a light background against which the
trees and figure stand out in silhouette.
The use of flashbulbs out of doors will enable you to get many pictures you otherwise might
miss and multiple flash will provide interesting and realistic effects. The single bulb is
useful in illuminating spots you might want to emphasize—in other words you paint with light
the places you want to be prominent. The bulb, should of course, be hidden from the camera so
that the source will not be evident.
The picture of the cadet and his date on page 86 was made with multiple flash. One bulb was
placed behind the statue to provide the main lighting for the picture and another was placed
to the right to get some sidelight on both statue and figures. A weak flash at the camera
position was used to bring out some of the details on the front side. When making pictures
of this type, there are usually plenty of assistants available to hold the flash bulbs where
you want them, aid in focusing by holding burning matches, etc.
The highlights on the statue were from a street lamp quite a distance away and were quite unexpected.
Such highlights frequently are useful in perking up the scene and are sometimes bright enough to
be an aid in focusing.
The picture of the giant catalytic petroleum cracking tower above was taken under much the
same conditions as the Camerette cover picture. As in the latter picture, the great height
of the tower necessitated the full use of the rising front, plus the swing back and off center
lens mounting.
Perhaps the most important phase of night photography is done right in the darkroom, and that
is the development of the film. Due to the great contrast of night scenes, especially those
which contain lights, the films must be developed on the soft side and in a softworking developer.
The two pictures of the cat cracker illustrate how important proper development is. The one shot,
with bright highlights and blocked up shadows was developed in a straight normal contrast developer.
The second picture was developed in a standard formula from which the carbonate had been omitted.
To use this method. mix up the developer omitting the carbonate, which is mixed separately and
kept handy in a graduate. Place the film in the developer and give it four times normal development.
When an inspection shows the image to be satisfactory, pour one quarter of the normal amount
of carbonate in the developer and allow the film to remain one minute additional then rinse
and hypo it. Agitation during the first part of the development is intermittent but after the
carbonate is added, it should be vigorous. The appearance of these negatives is ghastly but
they will print. In printing night shots, any of the available papers may be used in conjunction
with any of the standard developers. Blue toning, by the gold-chloride method is to be recommended
because the color produced is very suggestive of night.
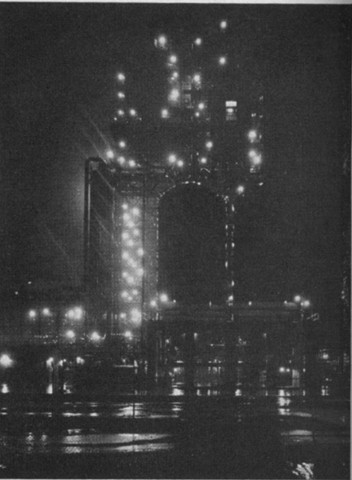
Catalytic Cracking Tower - Image 1
|
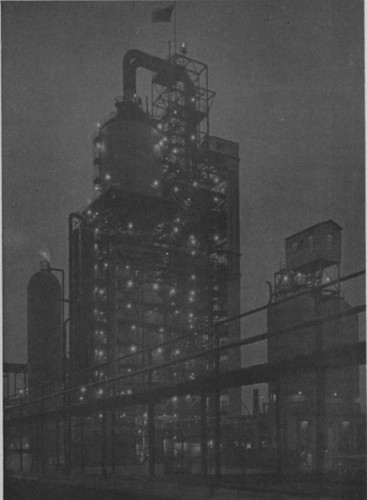
Catalytic Cracking Tower - Image 2
|
|
The negative for this picture, image 1, was given regular development in
a normal developer.
|
Compare this with image 2, which was
developed in a developer without carbonate in it.
|
As it is seldom possible to secure detail in the actual lights showing in the picture,
when making the print, expose for the shadow areas and let the highlights take care of themselves.
Of course, if you wish to create some special effect and do not care about shadow detail,
then your exposure may be on the longer side. Light areas may be burned in and areas which
may tend to go dark may be held back by the usual dodging methods, although if the film development
and exposure has been good, this is seldom necessary. Reduction of small, dense areas by means of
Farmer's Reducer is practically impossible as the solution will flow beyond the spot and create a
dark area when the print is made. If you must reduce an area use an abrasive.
The problems encountered in night photography are far from insurmountable and in the solving of
them comes much of the interest and enjoyment of the work. When you have an idea try it out,
you may get a surprisingly good picture.
|